Data Engineering Week 2 - Workflow Orchestration
What is Data Lake
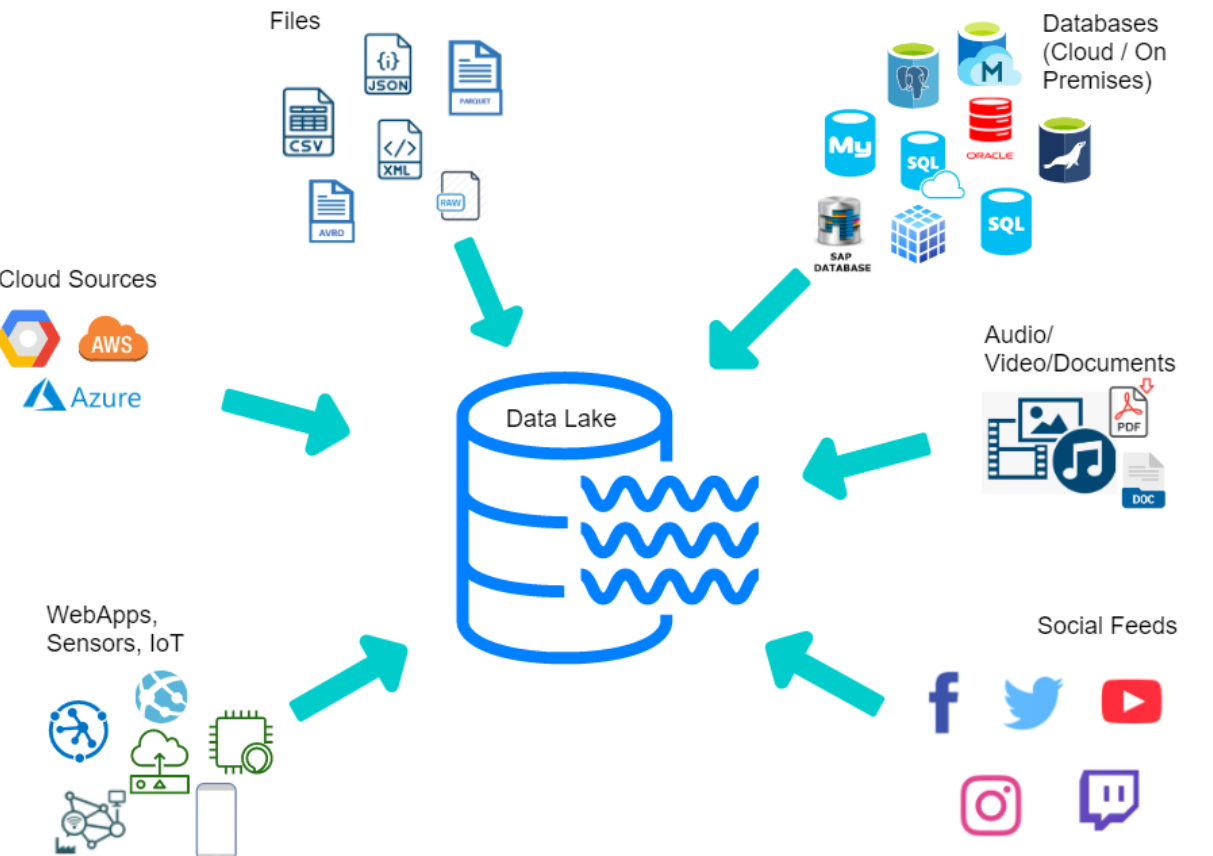
A Data Lake consists of a central repository where any type of data, either structured or unstructured, can be stored. The main idea behind a Data Lake is to ingest and make data available as quickly as possible inside an organization.
Several popular data lake solutions available, some of them are:
Amazon S3Google Cloud StorageMicrosoft Azure Data Lake StorageHadoop HDFS-
Snoflake Data Warehouse: It’s a cloud-based data warehouse solution with data lake component.
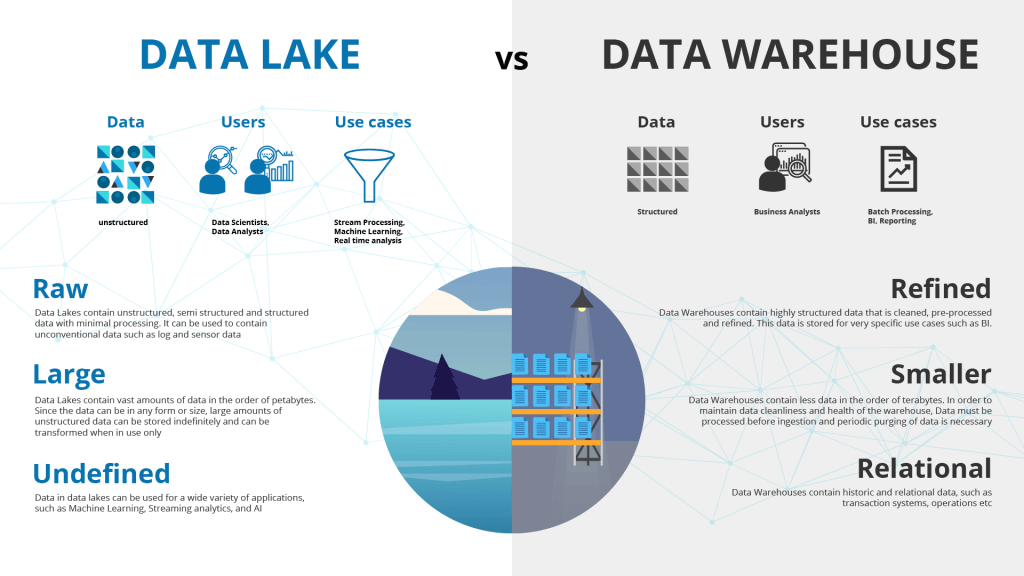
Data Lake vs. Data Warehouse
A Data Lake stores a huge amount of data and are normally used for stream processing, machine learning and real time analytics. On the other hand, a Data Warehouse stores structured data for analytics and batch processing.
Extract-Transform-Load (ETL) vs. Extract-Load-Transform (ELT)
ETL (Extract, Transform, Load) refers to the traditional approach of extracting data from various sources, transforming the data into the required format, and then loading the data into the warehouse.
ELT (Extract, Load, Transform) refers to a newer approach in which the is extracted from various sources and loaded into a data lake first and then transformed and processed for analysis.
ETL is usually a Data Warehouse solution, used mainly for small amount of data as a schema-on-write approach. On the other hand, ELT is a Data Lake solution, employed for large amounts of data as a schema-on-read approach.
Introduction to data warehouse
A data warehouse is a central repository of information that can be analyzed to make more informed decisions. Reports, dashboards, and analytics tools are indispensable for business users seeking to derive insights from their data, oversee business performance, and facilitate decision-making. The foundation of these tools lies in data warehouses, which store data efficiently to reduce input and output (I/O) operations, ensuring swift delivery of query results to a multitude of users simultaneously.
Popular data warehouse solution available are:
-
Amazon Redshift: A fully managed, petabyte-scale data warehouse service provided by Amazon Web Services (AWS). Redshift uses columnar storage, parallel query execution, and advanced compression algorithms to provide fast query performance. -
Google BigQuery: A serverless, highly scalable, and cost-effective cloud data warehouse provided by Google Cloud Platform. BigQuery supports SQL-like queries and provides fast query performance through its columnar storage and massive parallel processing. -
Microsoft Azure Synapse Analytics (formerly SQL Data Warehouse): A cloud-based big data analytics service provided by Microsoft Azure. It combines the capabilities of data warehousing and big data analytics, allowing organizations to analyze data at scale. -
Teradata: A relational database management system for data warehousing and big data analytics provided by Teradata Corporation. Teradata provides a scalable, high-performance platform for storing and analyzing large amounts of structured d
Workflow Orchestration
What is dataflow
A dataflow defines all extraction and processing steps that the data will be submitted to, also detailing any transformation and intermediate states of the dataset. For example, in an ETL process, a dataset is first extracted (E) from some source (e.g., website, API, etc), then transformed (T) (e.g., dealing with corrupted or missing values, joining datasets, datatype conversion, etc) and finally loaded (L) to some type of storage (e.g., data warehouse).
Introduction to workflow orchestration
A workflow orchestration tool allows us to manage and visualize dataflows, while ensuring that they will be run according to a set of predefined rules. A good workflow orchestration tool makes it easy to schedule or execute dataflows remotely, handle faults, integrate with external services, increase reliability.
Several tools available for workflow orchestration in data engineering are:
-
Apache Airflow: An open-source platform for programmatically authoring, scheduling, and monitoring workflows. -
AWS Glue: A fully managed extract, transform, and load (ETL) service offered by Amazon Web Services (AWS). -
Prefect: An open-source workflow orchestration tool that provides a simple and flexible interface for building and managing data pipelines. -
Luigi: An open-source Python module for building complex pipelines and workflows.
Introduction to Prefect concepts
Prefect is an modern management systems for data-intensive workflows. It’s the simplest way to transform any Python function into a unit of work that can be observed and orchestrated.
Loading data into Postgres using Prefect
Step 1
Create conda environment to install relevant libraries without affecting base environment.
Run conda create -n zoom python-3.9 where zoom is the environment name, you can name anything you want.
Then activate the environment by running conda activate
Step 2
Create requirements.txt file which contains all the relevant libraries which we will be using for this lesson.
pandas==1.5.2
prefect==2.7.7
prefect-sqlalchemy==0.2.2
prefect-gcp[cloud_storage]==0.2.4
protobuf==4.21.11
pyarrow==10.0.1
pandas-gbq==0.18.1
psycopg2-binary==2.9.5
sqlalchemy==1.4.46
Run pip install -r requirement.txt which will load all the libraries in the zoom environment.
Step 3
Now, lets transform the ingest_data.py file from week 1 into flows and tasks. we can use this concept of task and flow to break the ingest_data python script into multiple tasks and flows which would help us visualize our whole workflow better.
- Load the necessary libraries:
import os
import argparse
from time import time
import pandas as pd
from sqlalchemy import create_engine
from prefect import flow, task
from prefect.tasks import task_input_hash
from datetime import timedelta
- Create an extract function which will help extract data from the given url:
@task(log_prints=True, retries=3, cache_key_fn=task_input_hash, cache_expiration=timedelta(days=1))
def extract_data(csv_url):
    if csv_url.endswith('.csv.gz'):
        csv_name = 'yellow_tripdata_2021-01.csv.gz'
    else:
        csv_name = 'output.csv'

    os.system(f"wget {csv_url} -O {csv_name}")

    df_iter = pd.read_csv(csv_name, iterator=True, chunksize=100000)

    df = next(df_iter)

    df.tpep_pickup_datetime = pd.to_datetime(df.tpep_pickup_datetime)
    df.tpep_dropoff_datetime = pd.to_datetime(df.tpep_dropoff_datetime)

    return df
- Create a transform function to transform the data:
@task(log_prints=True)
def transform_data(df):
    print(f"pre: missing passenger count: {df['passenger_count'].isin([0]).sum()}")
    df = df[df['passenger_count'] != 0]
    print(f"post: missing passenger count: {df['passenger_count'].isin([0]).sum()}")

    return df
- Next we create load function(ingest_data) to load the data:
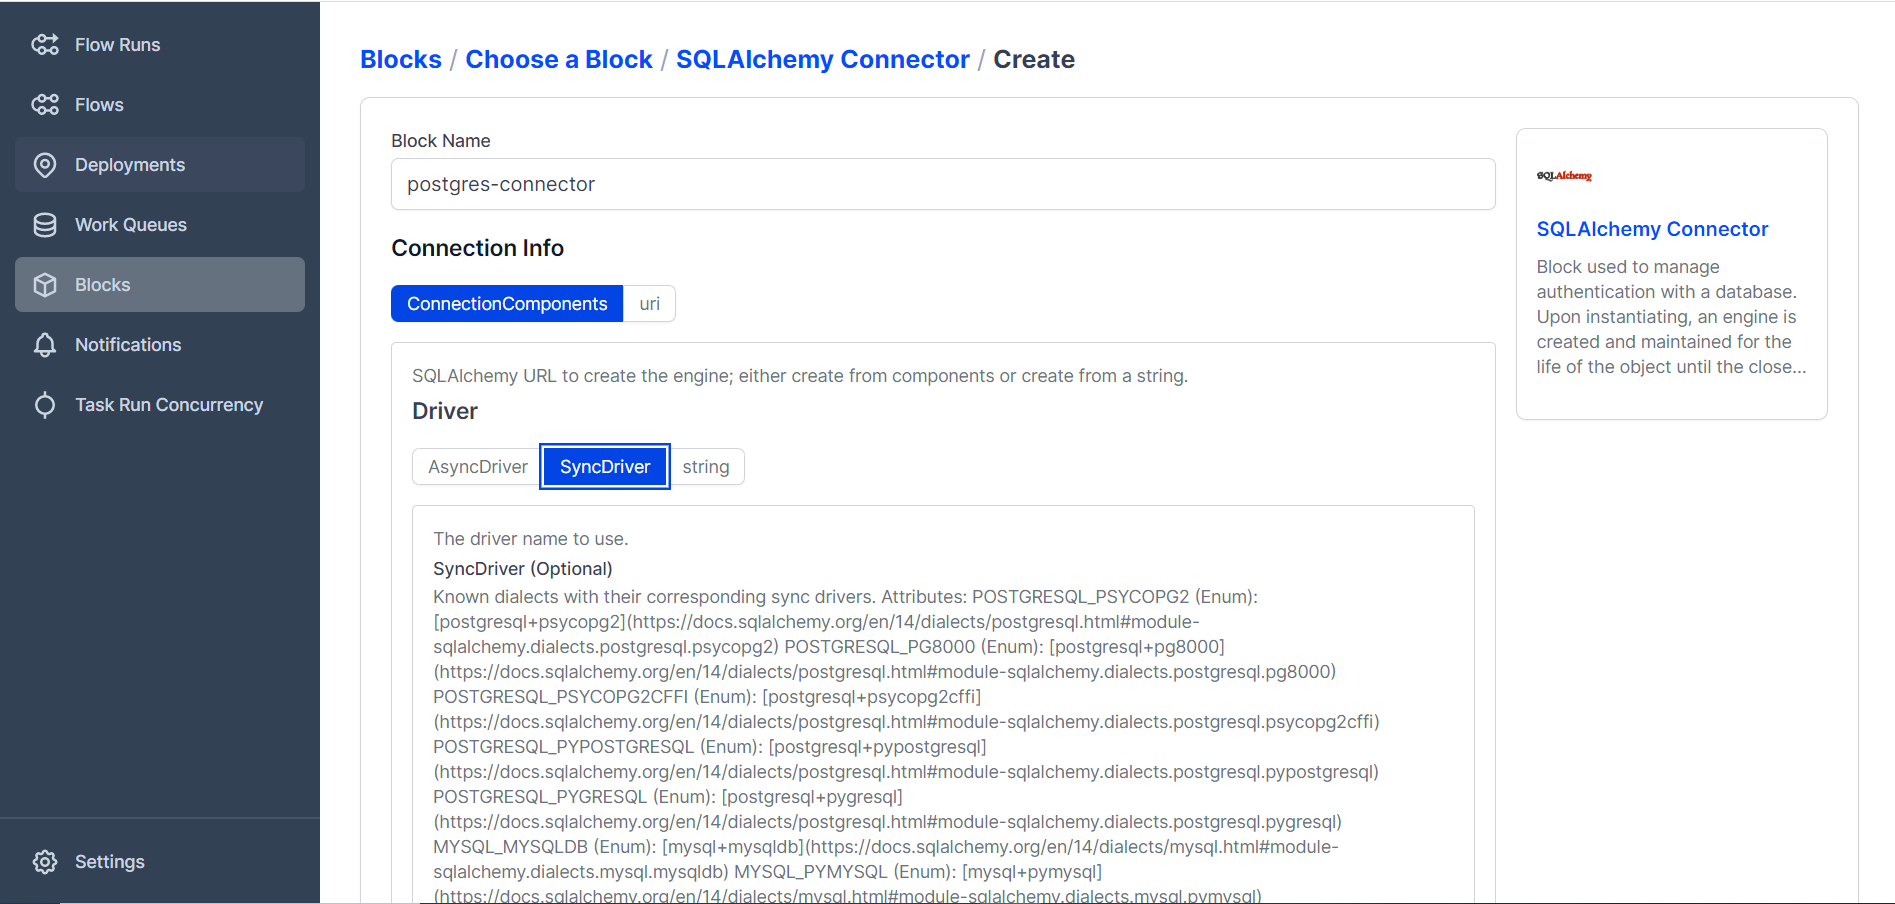
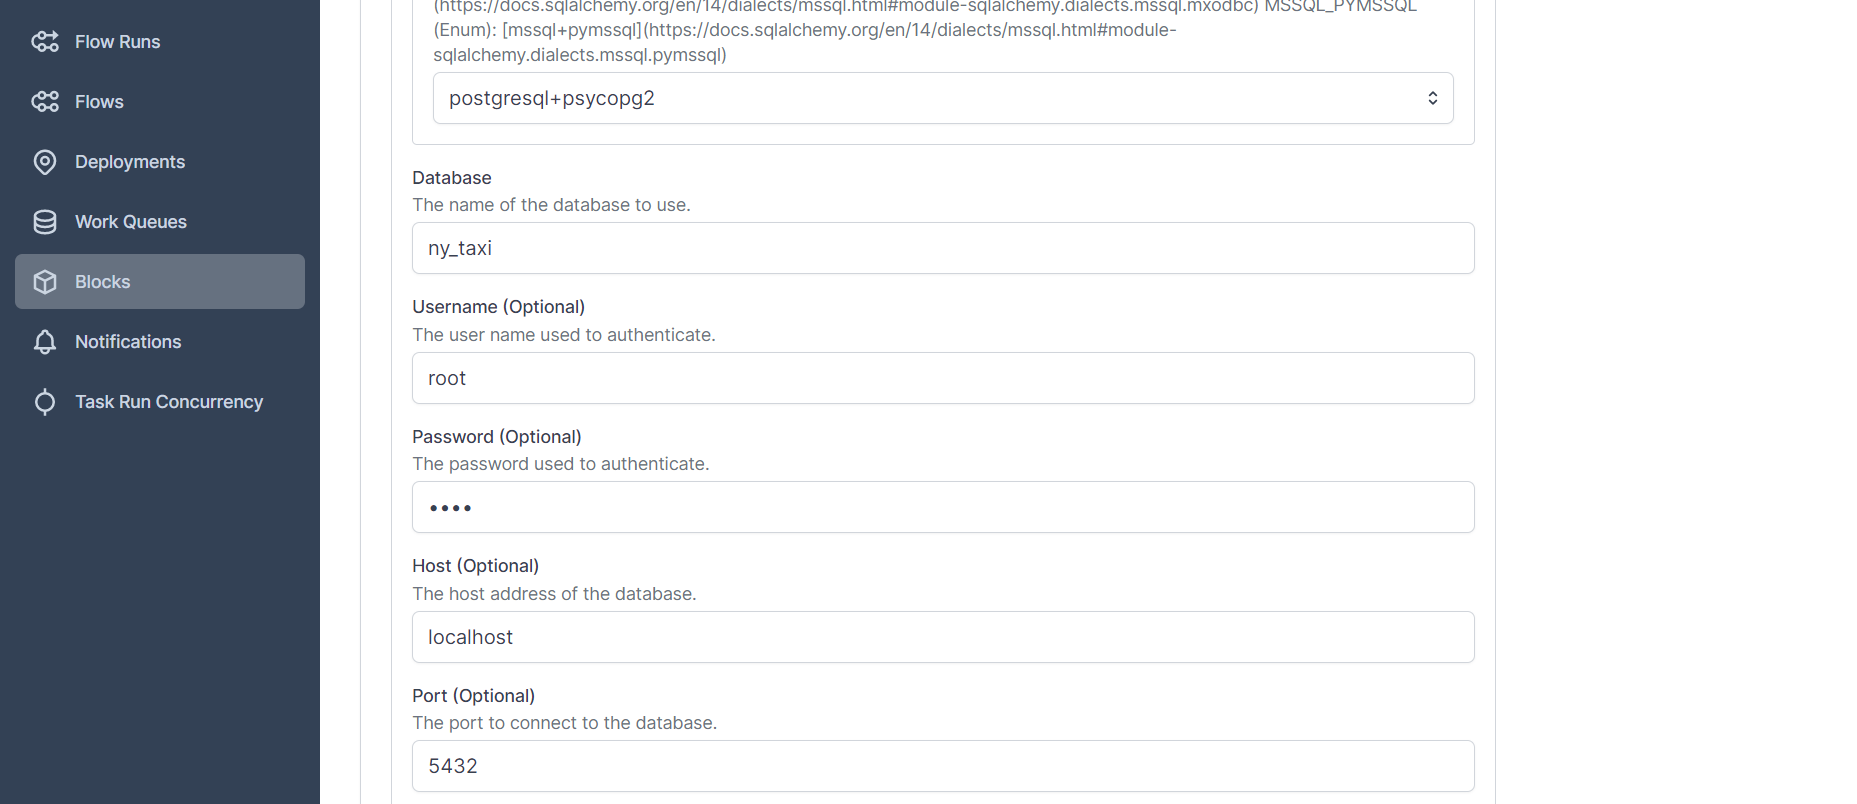
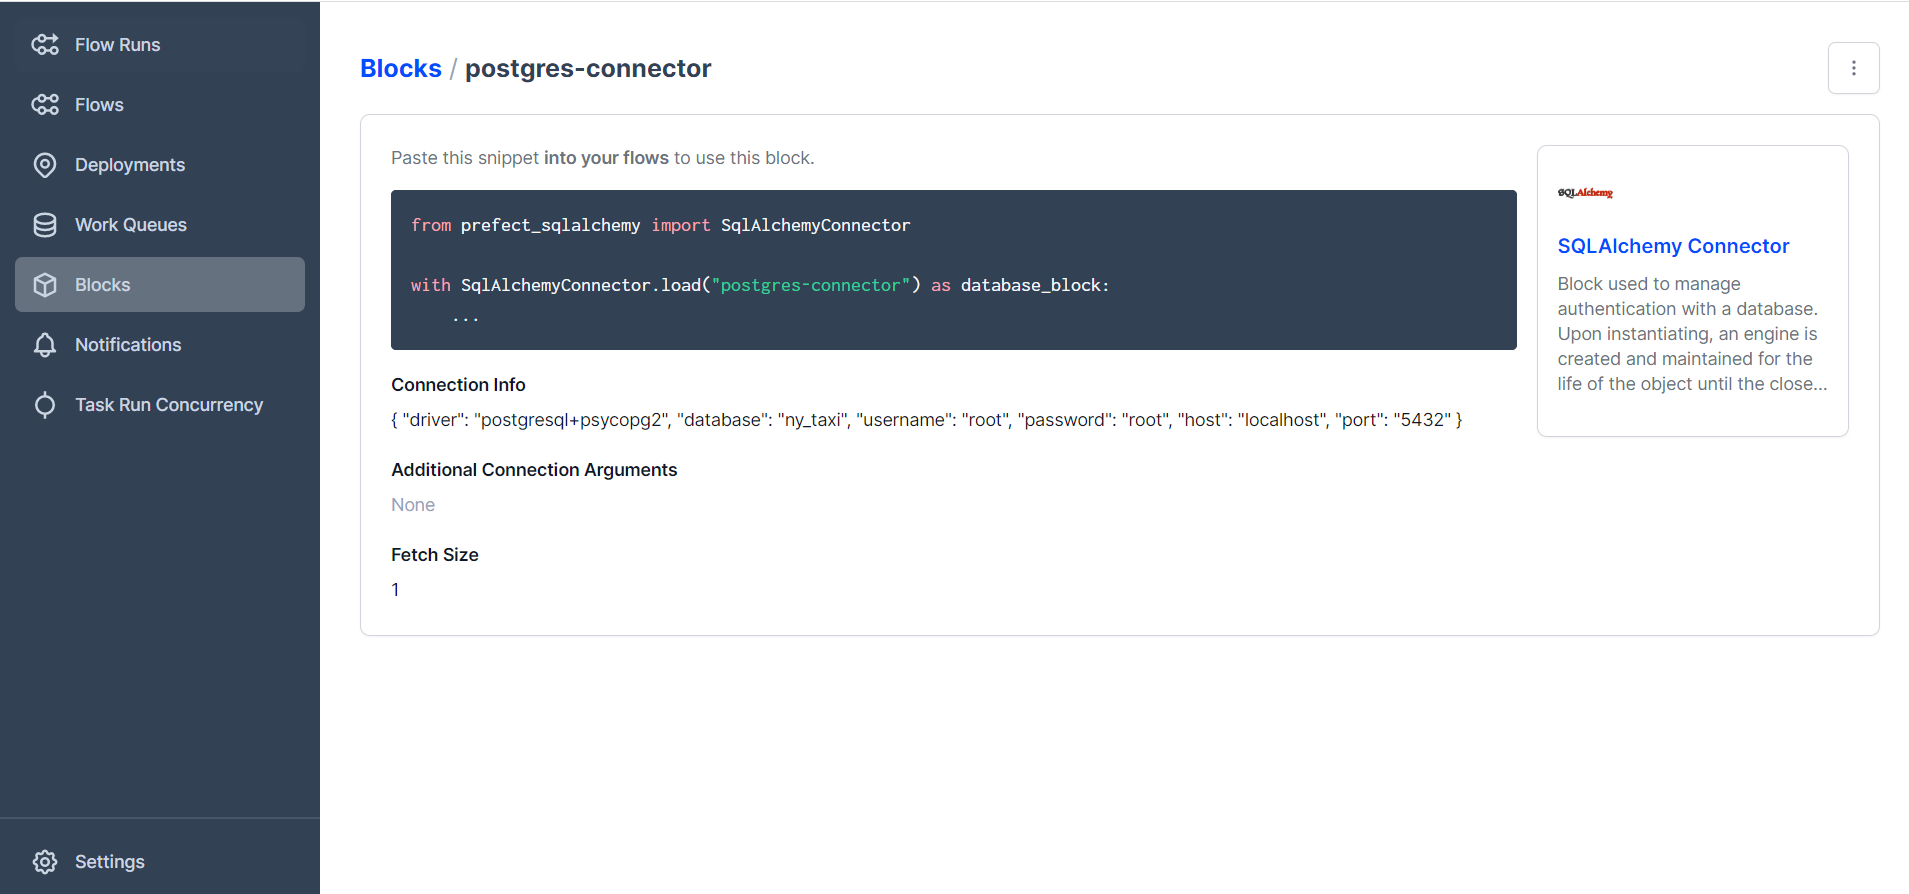
Here we use a concepts of block to store configuration and provide an interface of interacting with external systems.
In our ingest_data.py, instead of hard coding all the input credentials(url, user, passwords) as shown in below commented code we can create a block which can store the credentials and can be called directly.
@task(log_prints=True, retries=3)
def ingest_data(table_name, df):

    connection_block = SqlAlchemyConnector.load('postgres-connector')
    with connection_block.get_connection(begin=False) as engine:
        df.head(n=0).to_sql(name=table_name, con=engine, if_exists='replace')
        df.to_sql(name=table_name, con=engine, if_exists='replace')

        # postgres_url = f'postgresql://{user}:{password}@{host}:{port}/{db}'
        # engine = create_engine(postgres_url)

        # df.head(n=0).to_sql(name=table_name, con=engine if_exists='replace')
        # df.to_sql(name=table_name, con=engine, if_exists='append')
- Finally, we create a main function which will help us run all of these functions
@flow(name="Ingest Flow")
def main(table_name:str):
    # user = "root"
    # password = "root"
    # host = "localhost"
    # port = "5432"
    # db = "ny_taxi"
    csv_url = "https://github.com/DataTalksClub/nyc-tlc-data/releases/download/yellow/yellow_tripdata_2021-01.csv.gz"

    log_subflow(table_name)
    raw_data = extract_data(csv_url)
    data = transform_data(raw_data)
    ingest_data(table_name, data)

if __name__ == '__main__':
    main("yellow_taxi_trips")
Step 4
Save this file as ingest_data_flow.py and run the file through GitBash by using the command python ingest_data_flow.py
This should successfully load the data into postgres. But since we have only given the first chunk, it wont load the full dataset. As you can see below, since we set log_prints as True, we can clearly see the logs for each function. Also as you can see, the number of records is ~100,000 as only the first chunk is loaded. [185 records with 0 passenger count was removed. Check the transform function in the code above]
ETL to GCP
Step 1: Register the block with command
prefect block register -m prefect_gcp
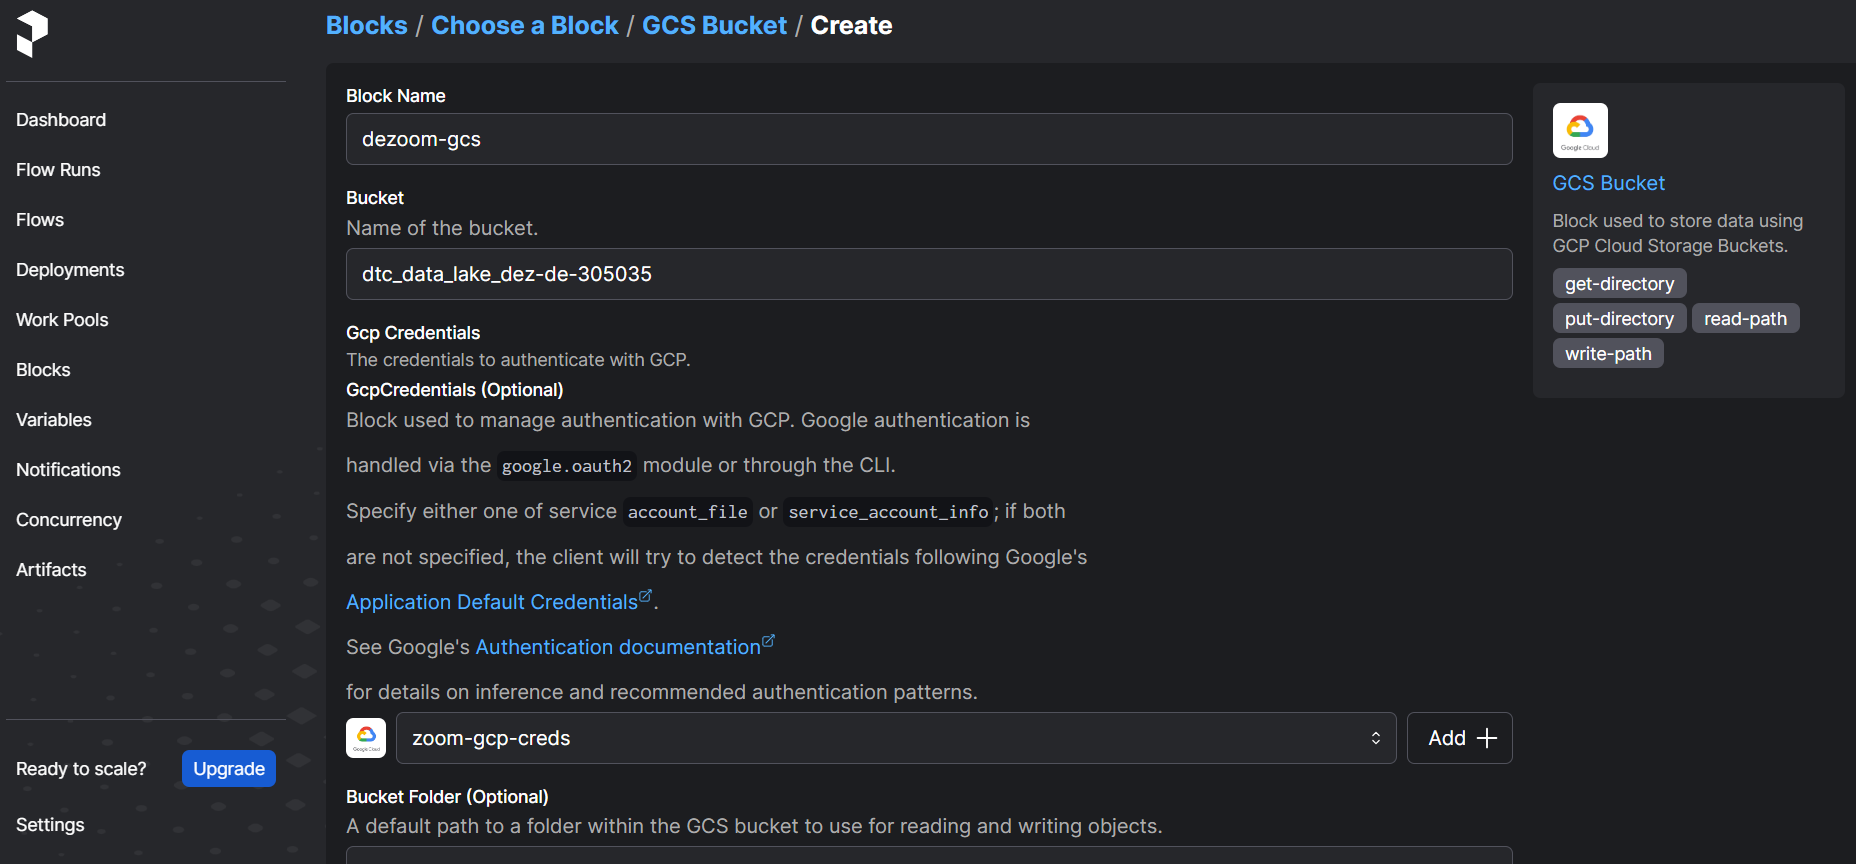
Step 2 : Create a google cloud storage bucket block connector
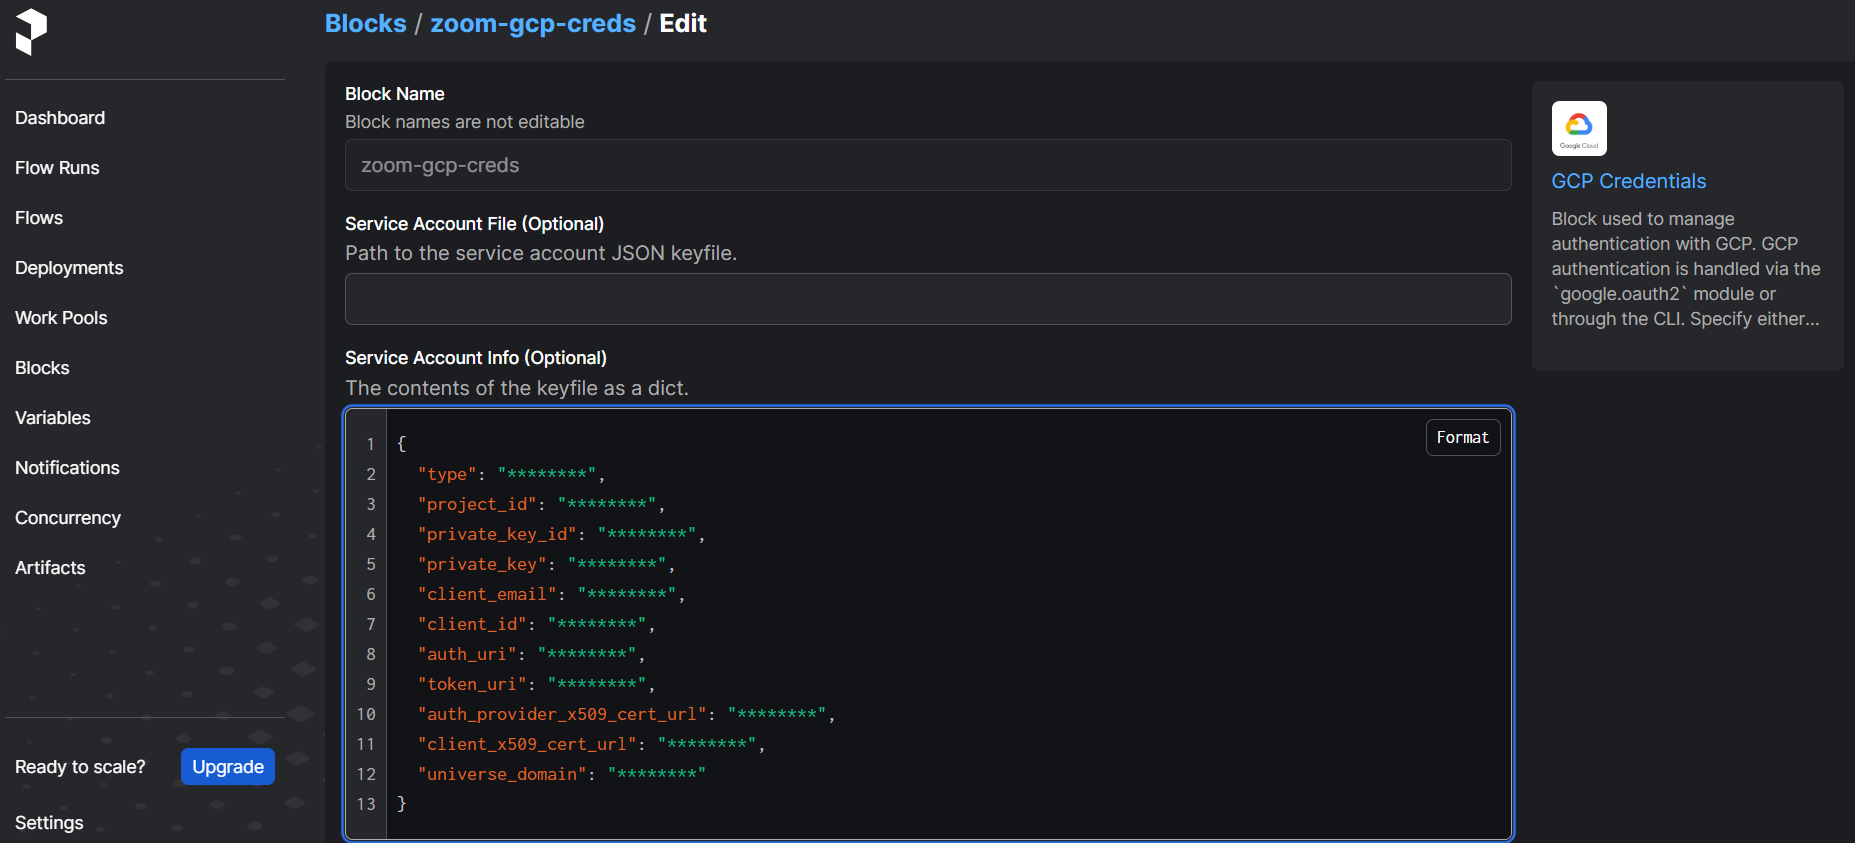
Step 3: Add GCS credential
Step 4 : ETL from gcs to bq
To write to gsc
@task()
def write_gcs(path:Path) -> None:
    """Upload the parquet file to gcs"""

    gcp_storage_block = GcsBucket.load("zoom-gcs")
    gcp_storage_block.upload_from_path(from_path = f"{path}", to_path=path)
    return
To load data to gcs we follow the same step as from loading to postgres and adjusted our code when necessary.
from pathlib import Path
import pandas as pd
from prefect import flow, task
from prefect_gcp.cloud_storage import GcsBucket
from random import randint
from prefect_gcp.cloud_storage import GcsBucket

@task(retries=3)
def fetch(dataset_url:str) -> pd.DataFrame:
    """Read taxi data from web into pandas DataFrame"""

    df = pd.read_csv(dataset_url)
    return df

@task(log_prints=True)
def clean(df=pd.DataFrame) -> pd.DataFrame:
    """Fix dtypes issues"""
    df['tpep_pickup_datetime'] = pd.to_datetime(df['tpep_pickup_datetime'])
    df['tpep_dropoff_datetime'] = pd.to_datetime(df['tpep_dropoff_datetime'])
    print(df.head(2))
    print(f"columns: {df.dtypes}")
    print(f"rows: {len(df)}")
    return df

@task()
def write_local(df:pd.DataFrame, color:str, dataset_file:str) -> Path:
    """Write Dataframe out as parquet file"""

    path = Path(f"../data/{color}/{dataset_file}.parquet")
    df.to_parquet(path, compression="gzip")
    return path


@task()
def write_gcs(path:Path) -> None:
    """Upload the parquet file to gcs"""

    gcp_storage_block = GcsBucket.load("zoom-gcs")
    gcp_storage_block.upload_from_path(from_path = f"{path}", to_path=path)
    return

@flow()
def etl_web_to_gcs() -> None:
    """The Main ETL Function"""
    color = "yellow"
    year = 2021
    month = 1
    dataset_file = f"{color}_tripdata_{year}-{month:02}"
    dataset_url = f"https://github.com/DataTalksClub/nyc-tlc-data/releases/download/{color}/{dataset_file}.csv.gz"

    df = fetch(dataset_url)
    df_clean = clean(df)
    path = write_local(df_clean, color, dataset_file)
    write_gcs(path)

if __name__ == '__main__':
    etl_web_to_gcs()
Prefect Deployment
Prefect is a workflow management system designed to help data engineers and data scientists automate, schedule, and monitor data workflows. Deploying a Prefect workflow involves setting it up to run in a production environment, allowing it to be executed on a schedule or triggered by external events.
Using Prefect CLI
There are two methods to deploy the flow: CLI or python file.
prefect deployment build ./parameterized_flow.py:etl_parent_flow -n "Parameterized ETL"
-
Command:
prefect deployment build: This Prefect CLI command is used to prepare the settings for a deployment. The build command likely indicates that it’s configuring and setting up the deployment environment. -
./parameterized_flow.py:etl_parent_flow: This part of the command specifies the location of the Prefect flow script file and the name of the entrypoint flow function. In this case, the script is parameterized_flow.py, and the entrypoint flow function is etl_parent_flow. The format is file_path:entrypoint_function.
-
-n log-simple: This part of the command uses the -n flag to specify a name for the deployment. In this case, the name provided is log-simple. Naming deployments can be helpful for identification and management.

As you can see from the output that prefect deployment build command generates a YAML file defining a Prefect deployment. It includes workflow details (file, object name), deployment info (name, version, environment), configuration values, and metadata (creation timestamp, Prefect version). This YAML file is input for deploying or updating workflows via Prefect CLI or API, allowing easy management and modification of deployments.
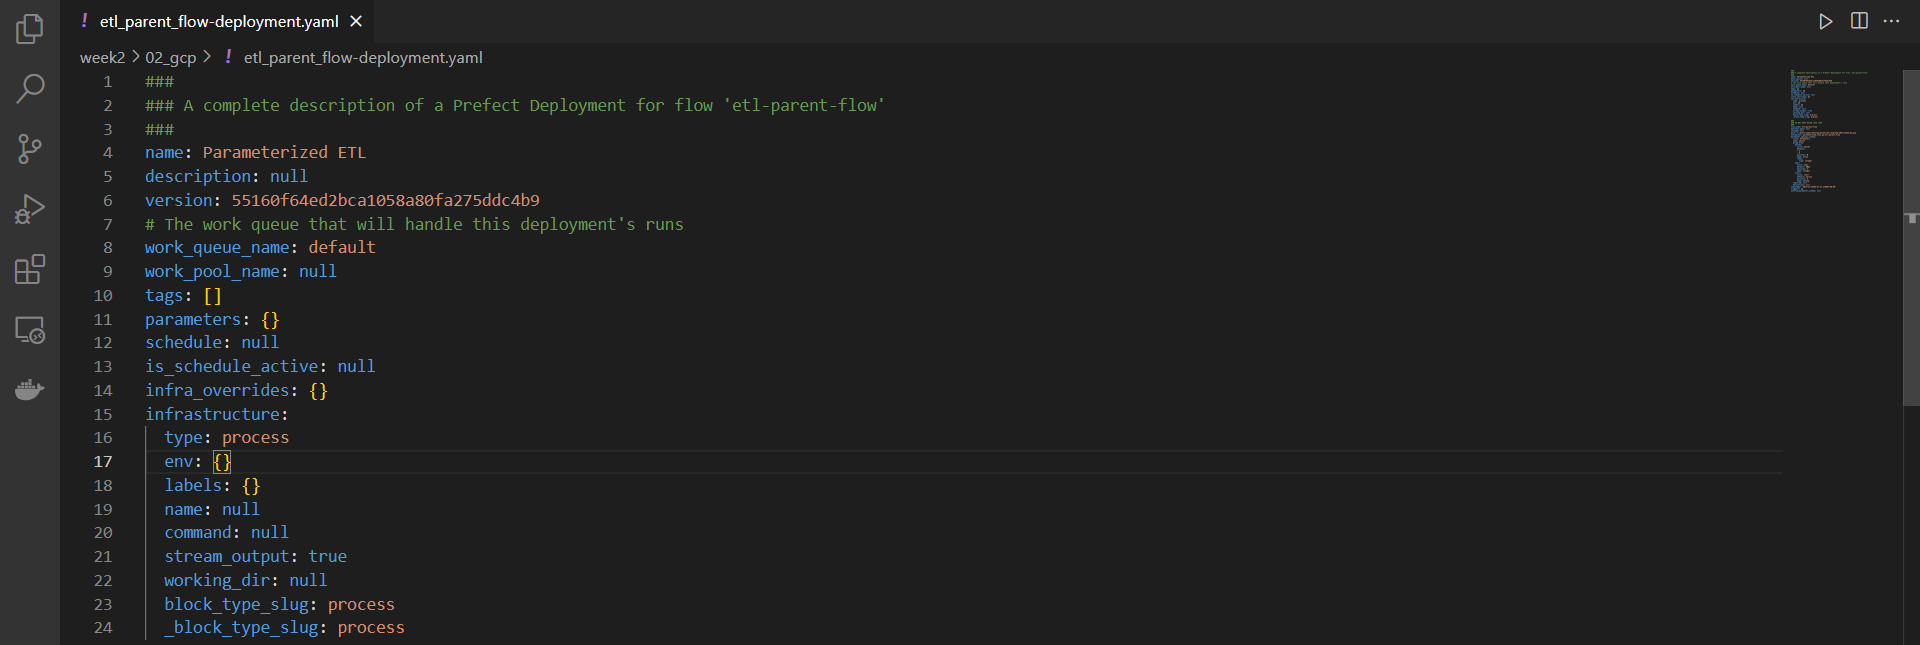
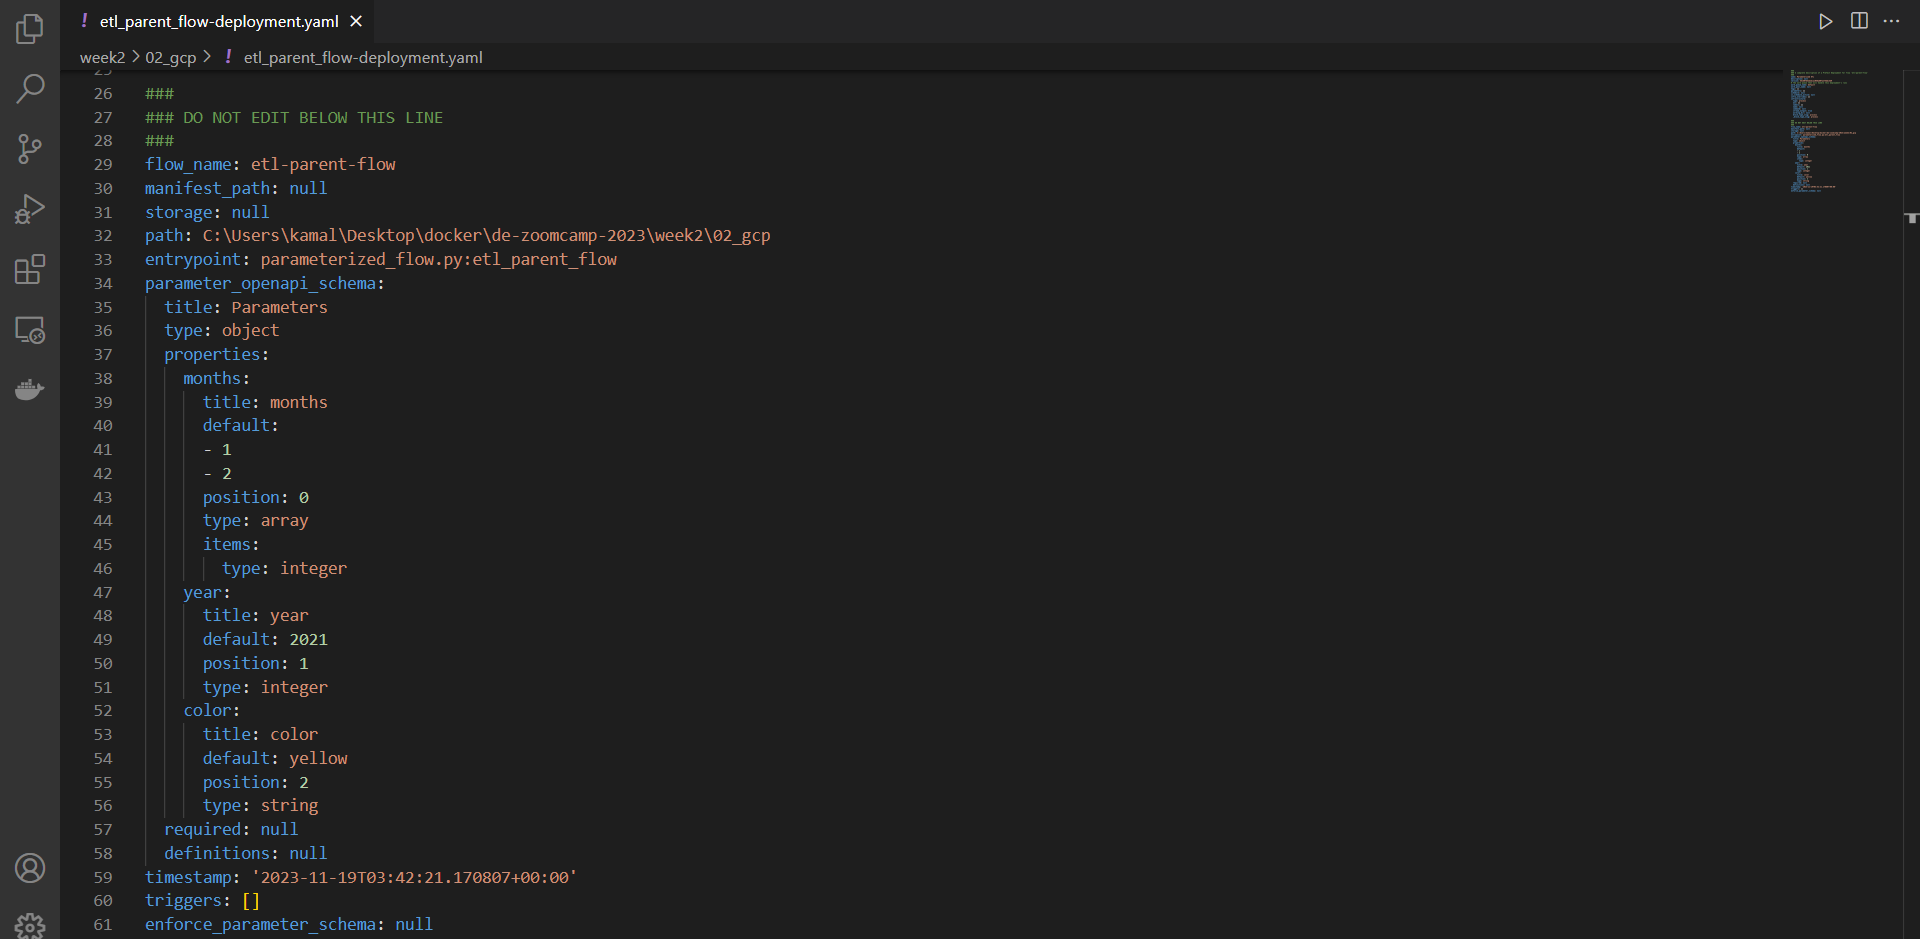
Before deploying, we can edit some of the work queue in the YAML file to add more details like Parameters, schedules, etc.
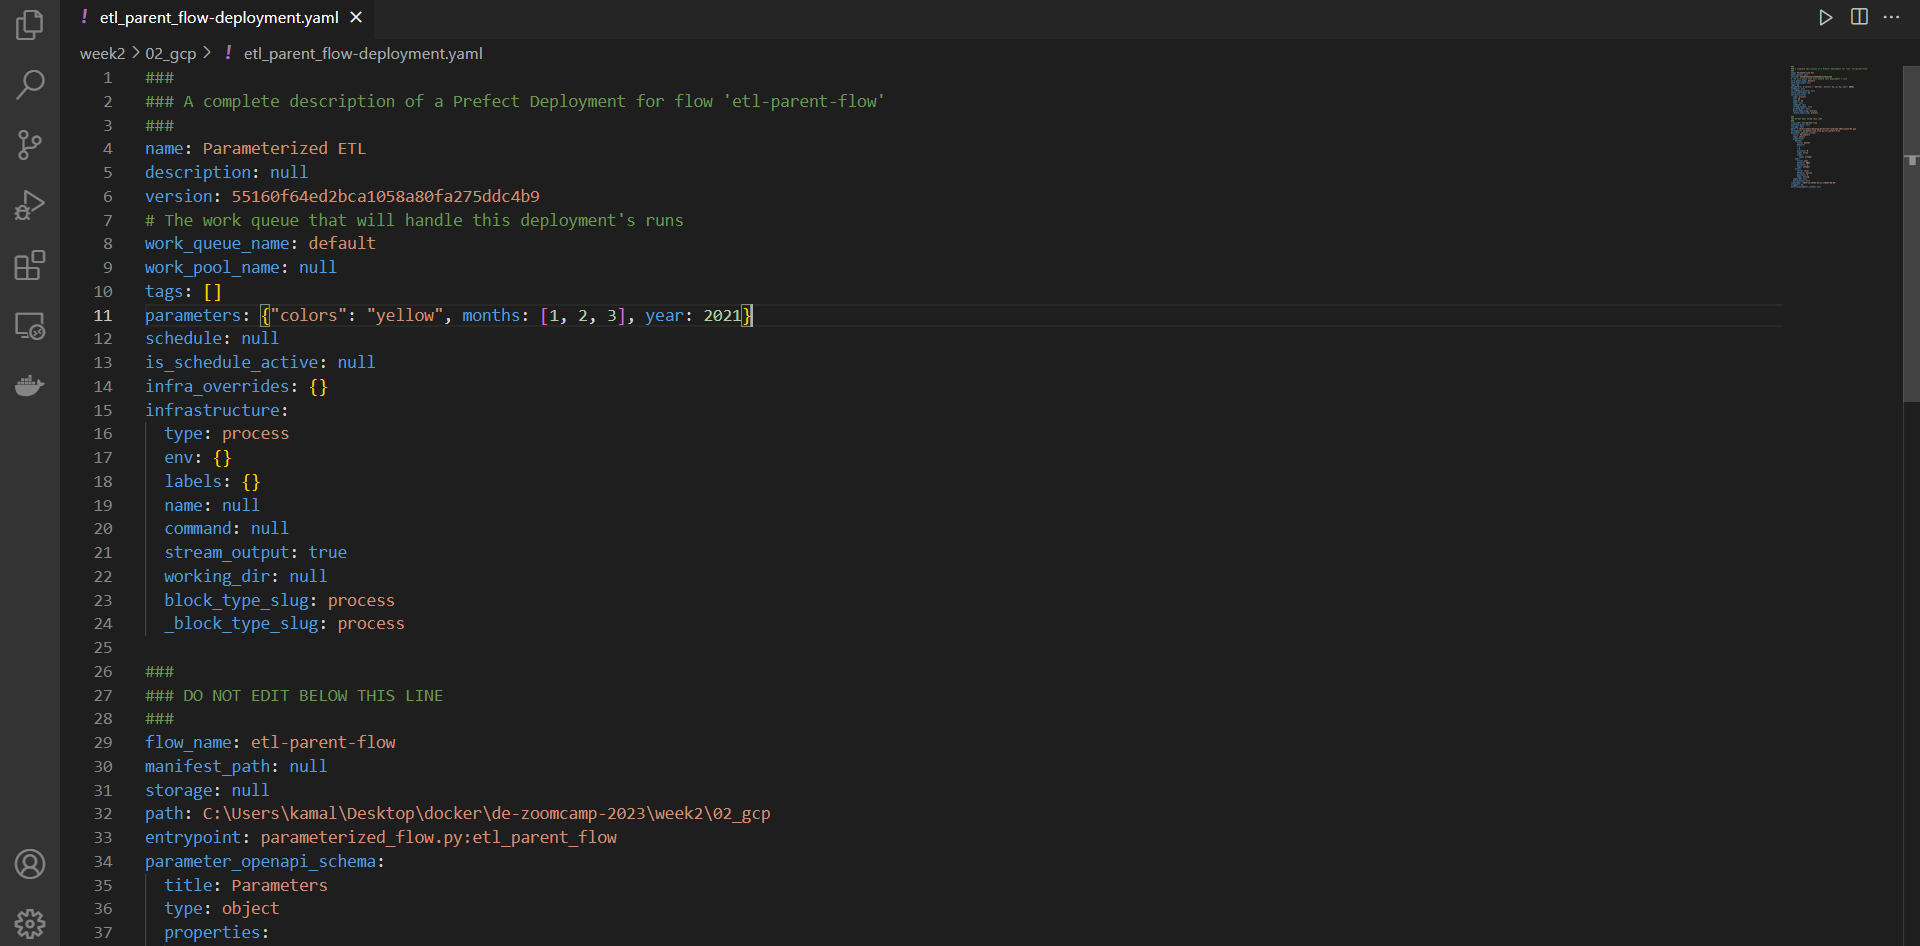
Then we can use the following command to apply the deployment
prefect deployment apply etl_parent_flow-deployment.yaml
This action involves deploying the workflow described in the YAML file to the target environment. The specific target environment could be either a Prefect Cloud instance or a Prefect Server, depending on the configuration details specified within the YAML file.

If you navigate to the prefect UI, you can see that the deployment has been created:
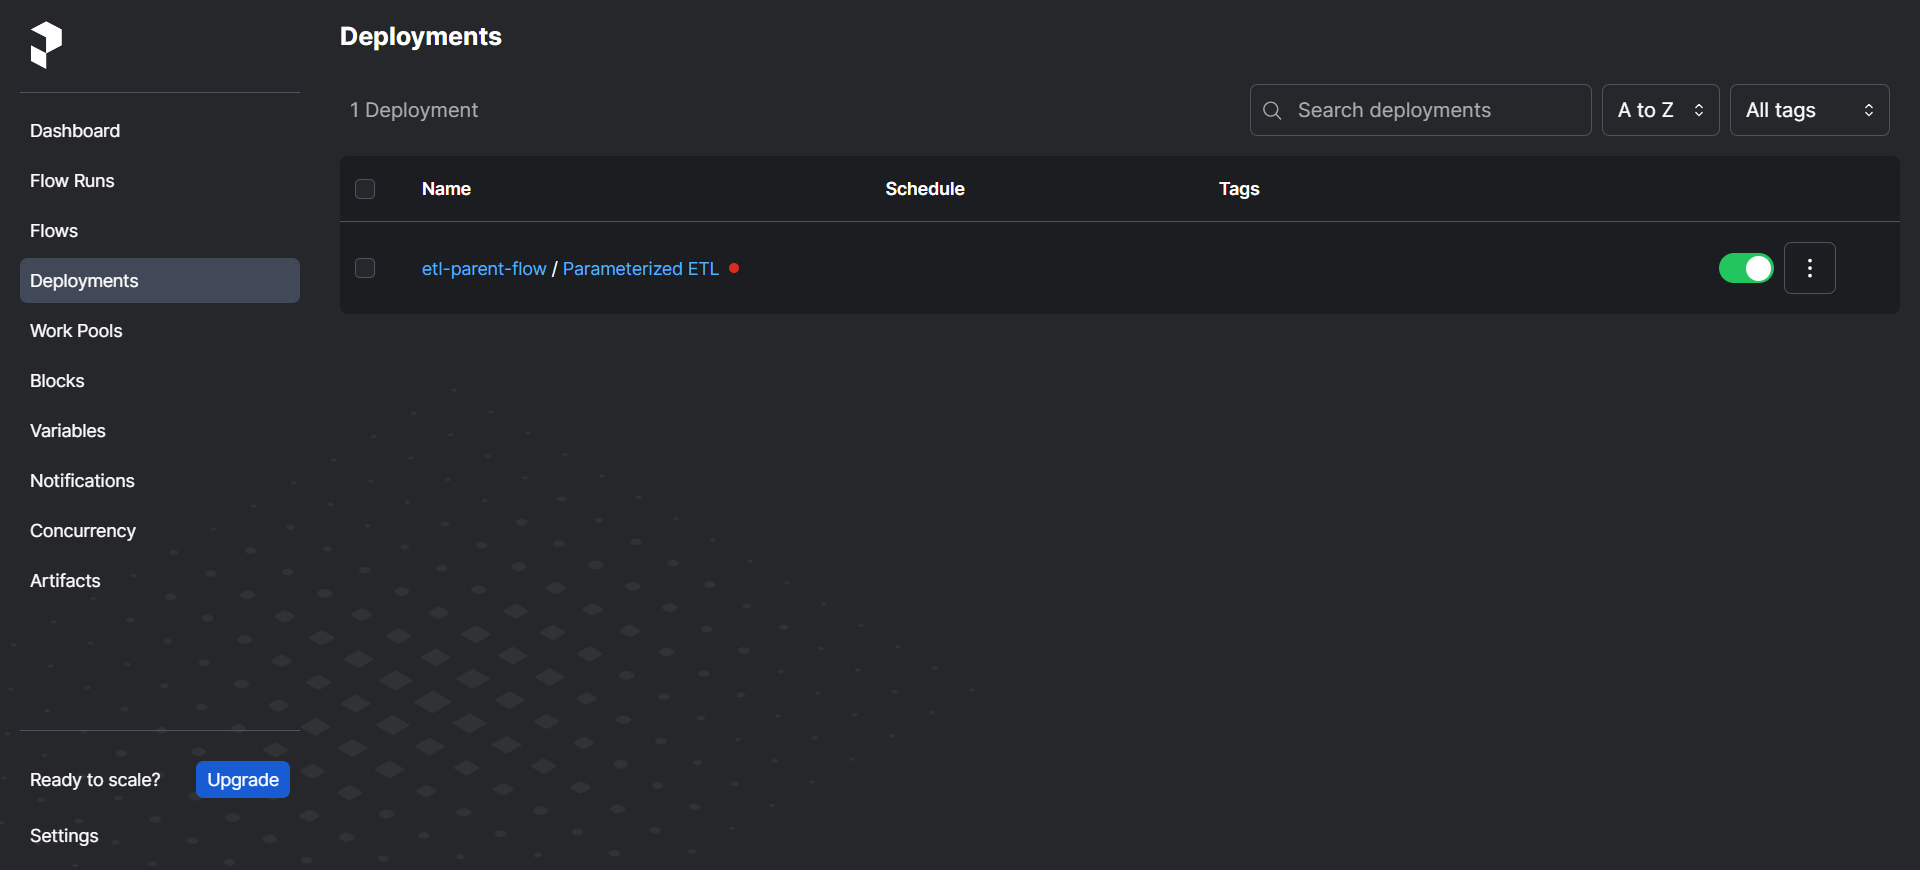
There are 2 types of run -
Quick Run - Simpler way to run a workflow, providing only a limited set of options. The inputs and environment variables are pre-configured based on the default values specified in the workflow, and you cannot specify additional options or modify the inputs and environment variables.
Custom Run - Allows you to manually specify the input parameters and environment variables for a run, and provides greater control over the execution of the workflow. You can also specify advanced run options, such as the run schedule and how long to retain logs and artifacts.
Agents and Work Queues
In Prefect, two key concepts for executing workflows in a distributed manner are “Work Queues” and “Agents.”
Work Queues:
- A Work Queue is a data structure that serves as a buffer between Prefect Core and the agents.
- It holds tasks that are ready to be executed, allowing Prefect Core to manage the tasks while agents pull and execute them.
- Work Queues facilitate a smooth flow of tasks between the workflow manager and the agents.
Agents:
- An Agent is a software component responsible for pulling tasks from the Work Queue and executing them.
- Agents can operate on various platforms, such as local machines, cloud infrastructure, or containers.
- They play a crucial role in the distributed execution of workflows.
- Agents can be deployed on a single node or in a cluster, working collaboratively to process tasks from the Work Queue.
- They contribute to the parallel and scalable execution of tasks by efficiently distributing the workload.
Our Example
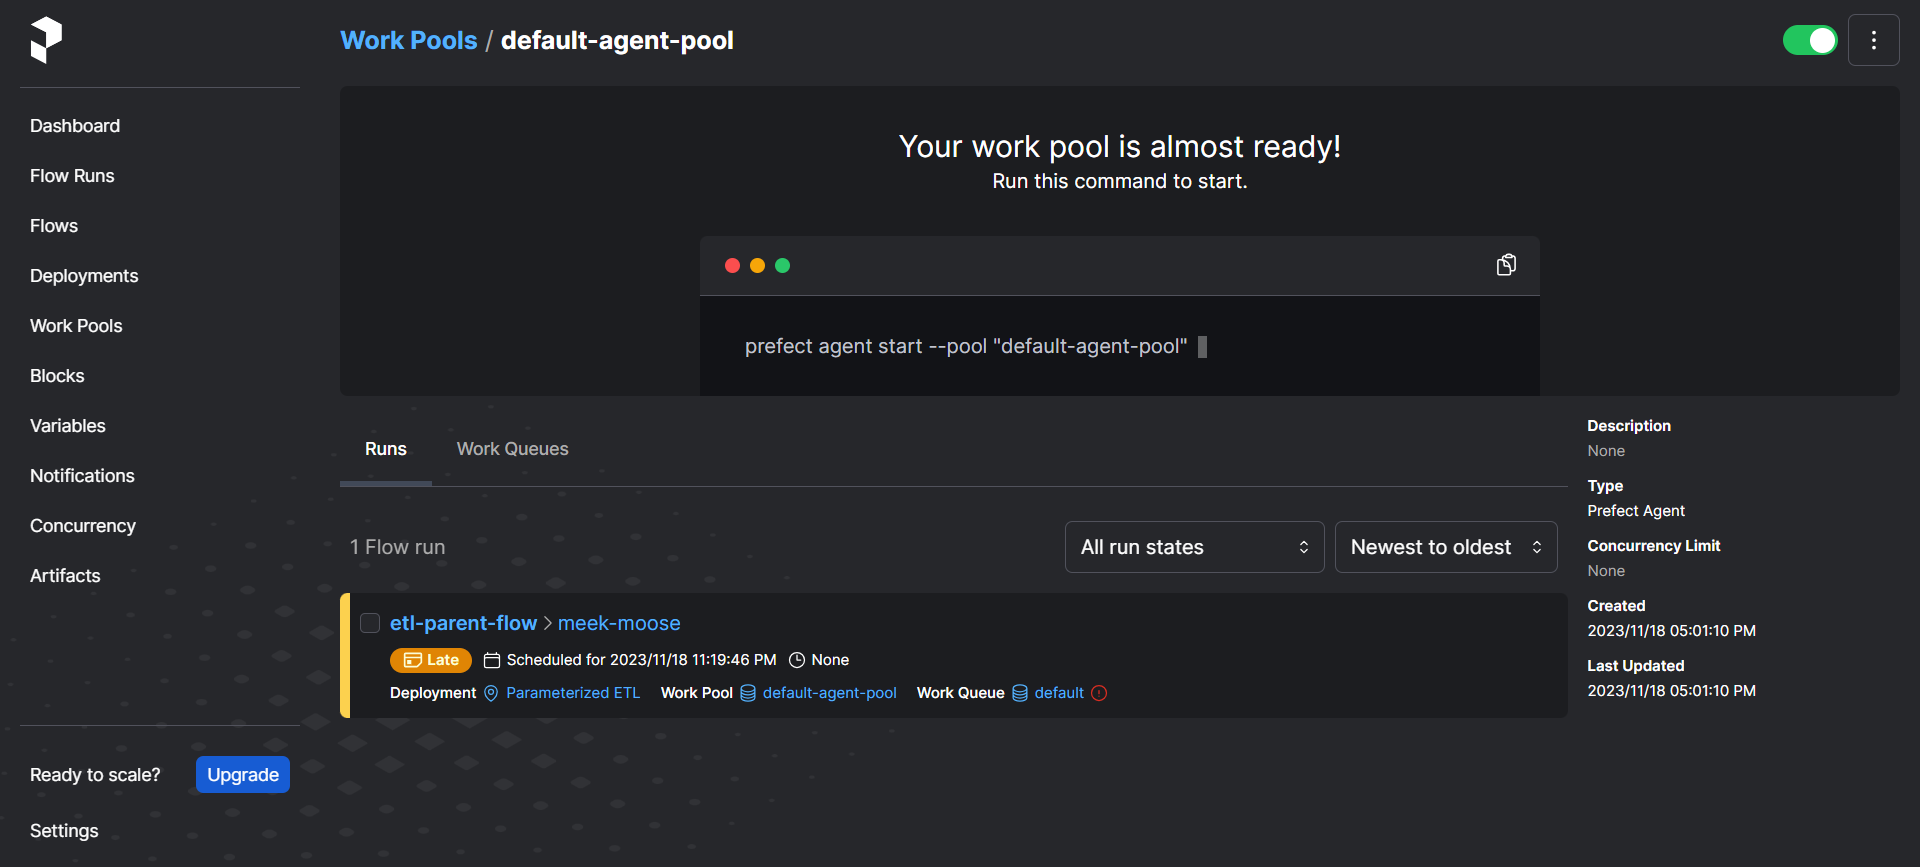
We can then call the agent to pick up the workflow and execute it by using the following command -
prefect agent start --work-queue "default"
Docker Infrastructure
- Create docker image
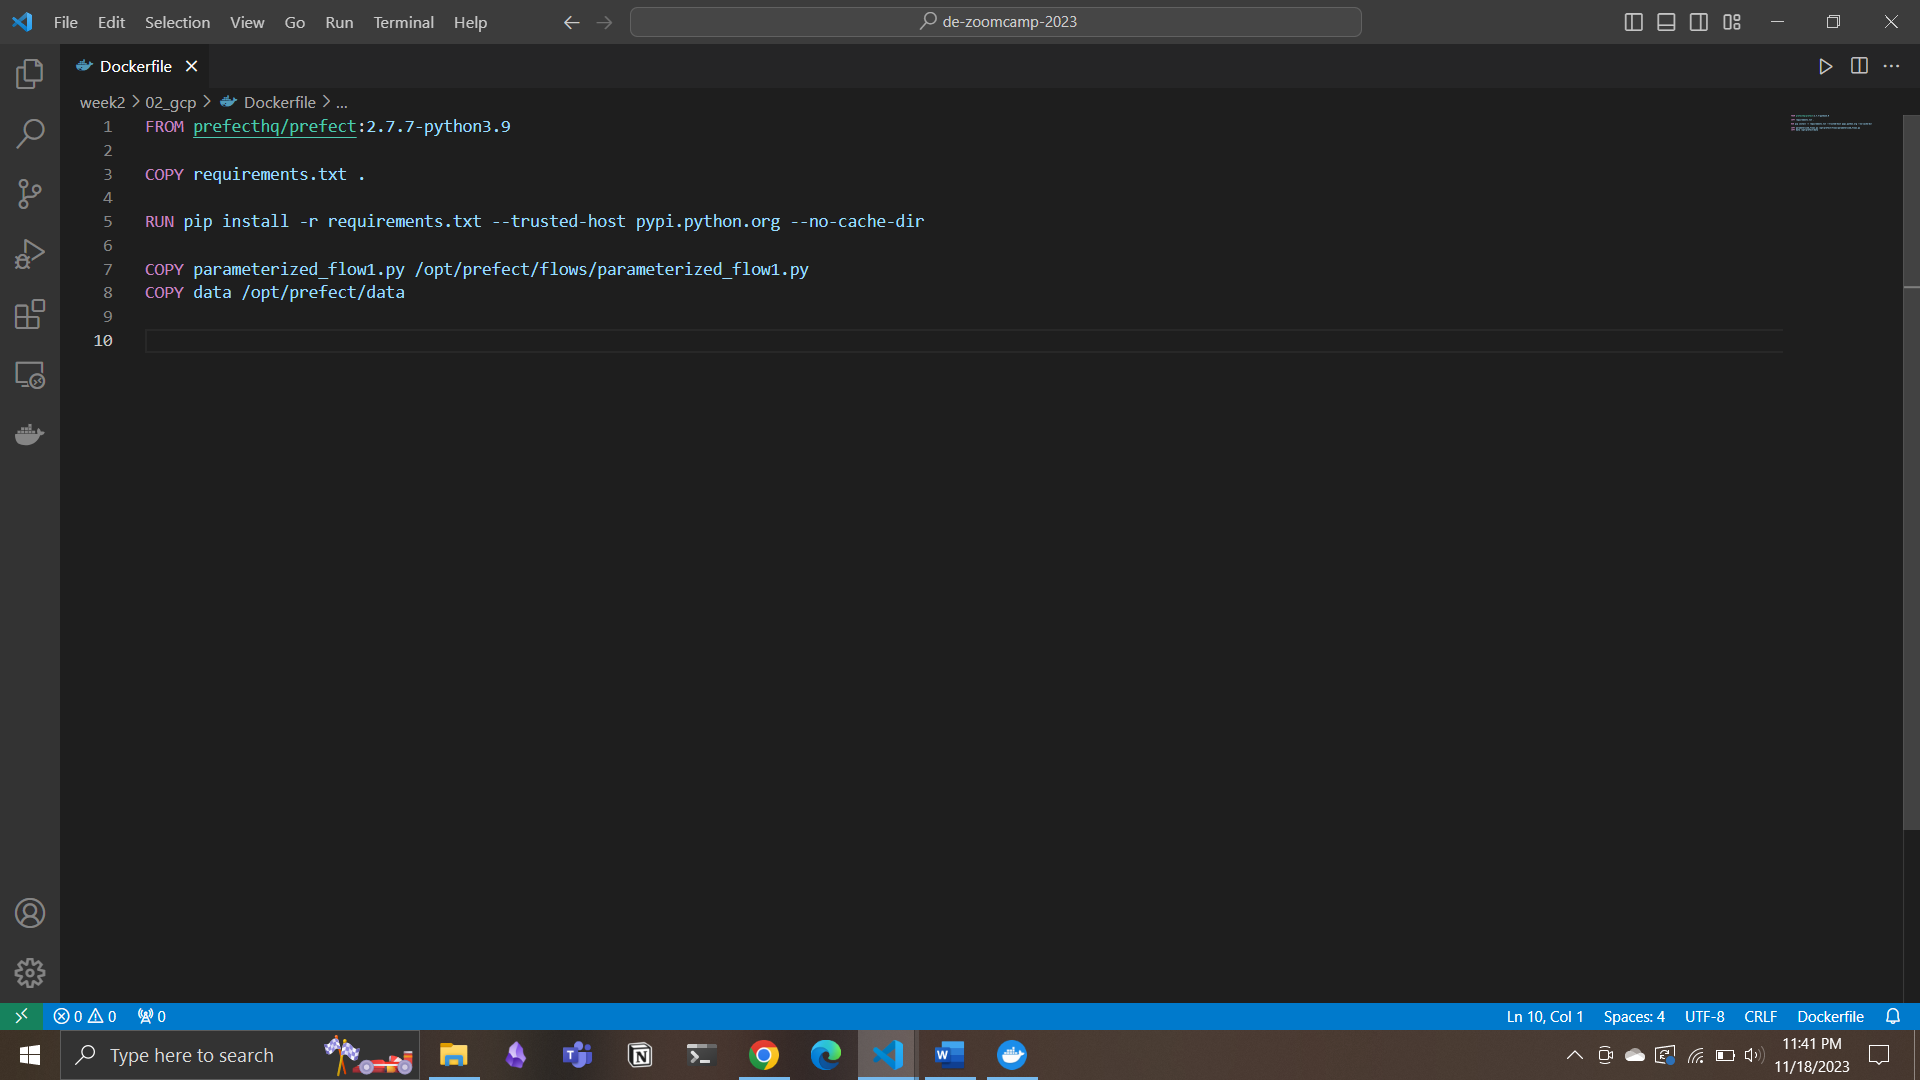
- Run the command
docker build -t <hub-user>/<repo-name>[:<tag>] .->docker image build -t k2ki/prefect:zoom .

-
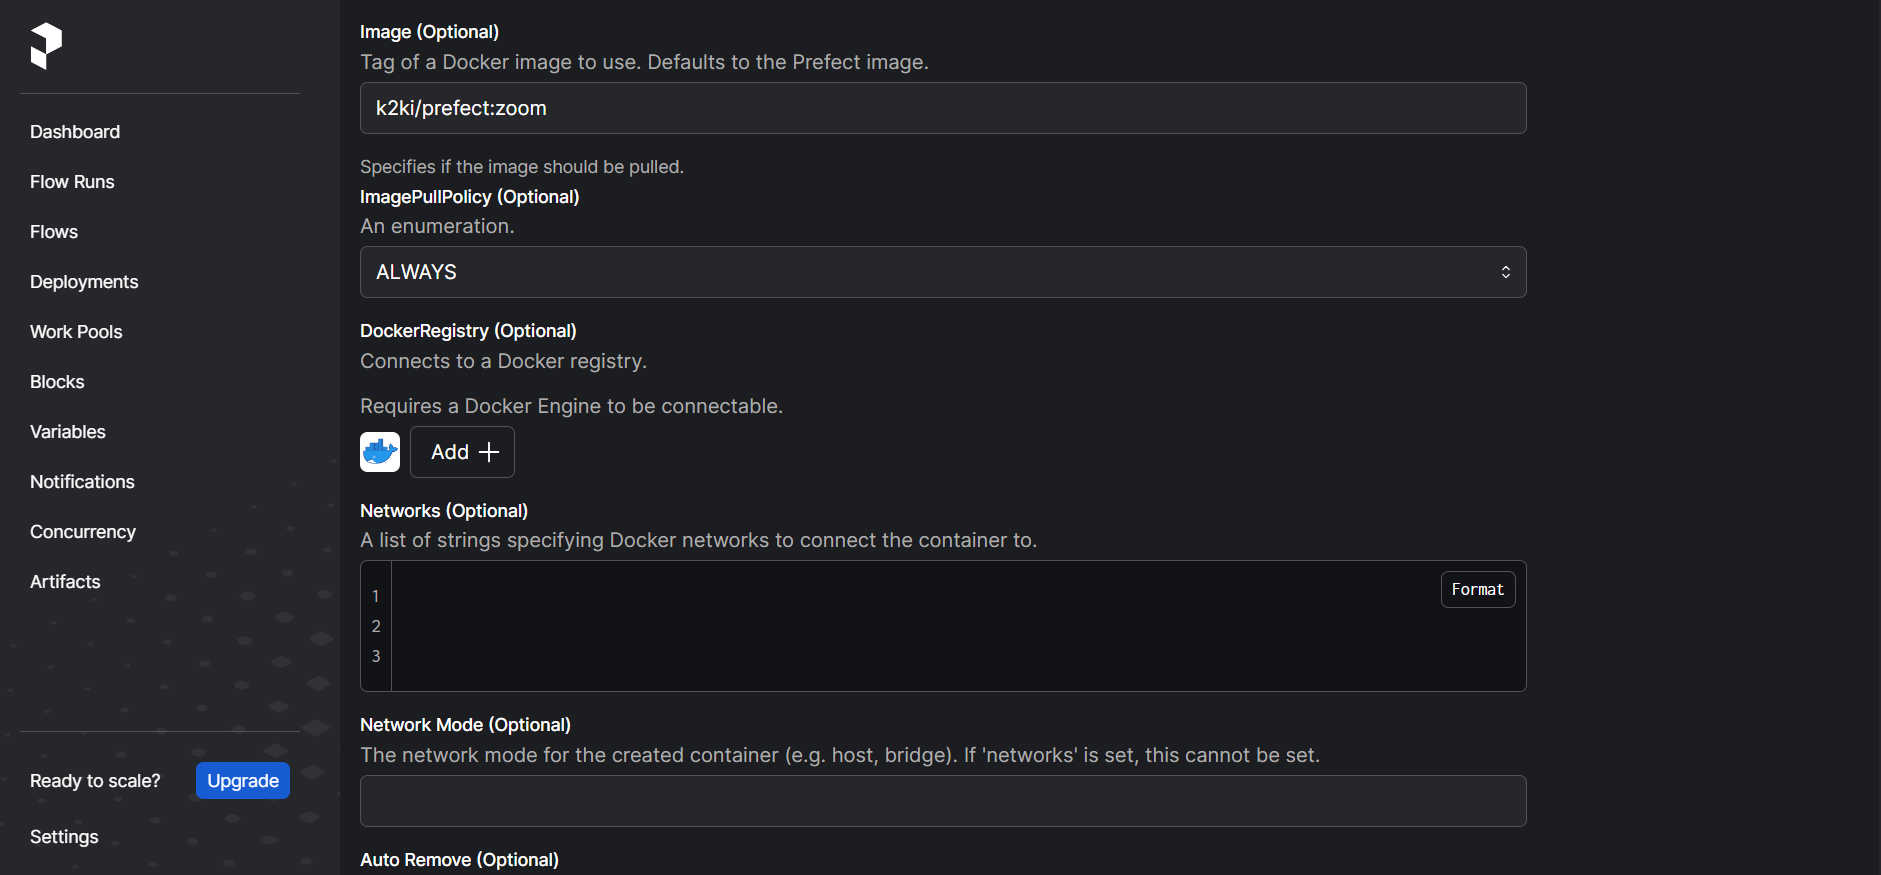
push it into the hub so that it can be used
docker image push k2ki/prefect:zoom -
Create docker block in Prefect UI. Edit the field accordingly.
prefect deployment
- write the python code
from prefect.deployments import Deployment
from prefect.infrastructure.container import DockerContainer
from parameterized_flow1 import etl_parent_flow

docker_block = DockerContainer.load("zoom")

docker_dep = Deployment.build_from_flow(flow=etl_parent_flow, name="docker-flow", infrastructure=docker_block)

if __name__ == "__main__":
    docker_dep.apply()
- Execute the code
python docker_deploy.py
- Verify in prefect UI
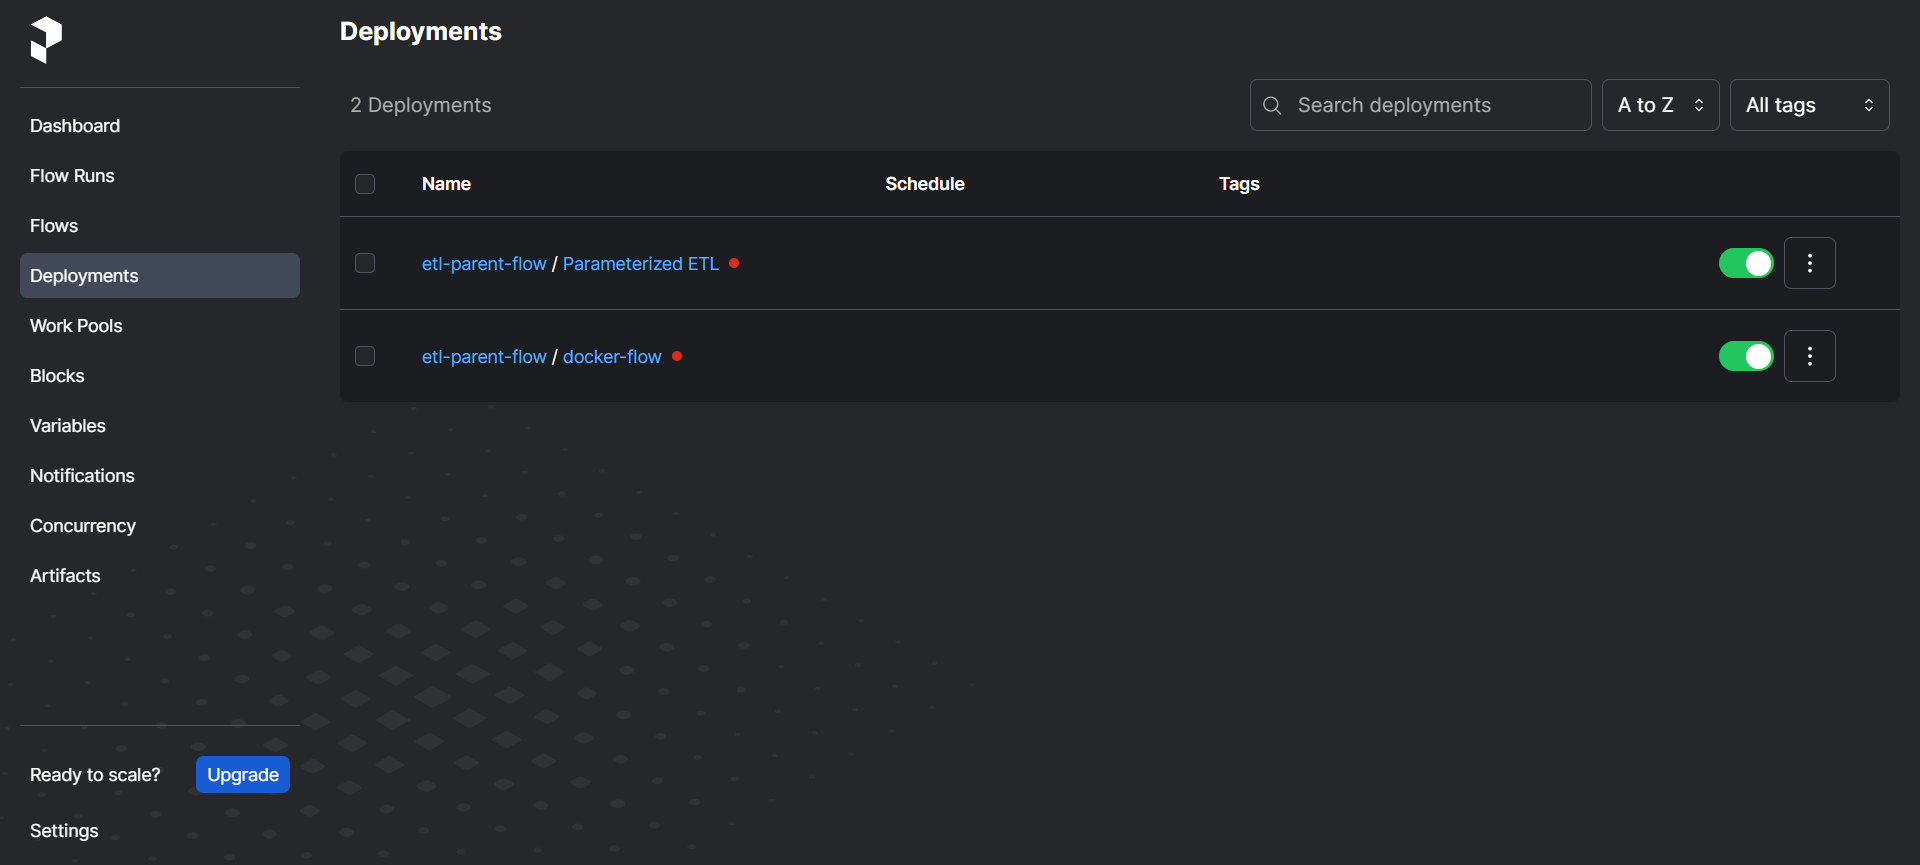
- Start an agent using
prefect agent start -q default

- Run the docker flow we created from CLI by running the command
prefect deployment run etl-parent-flow/docker-flow
This should complete the workflow process load the data into GCS.